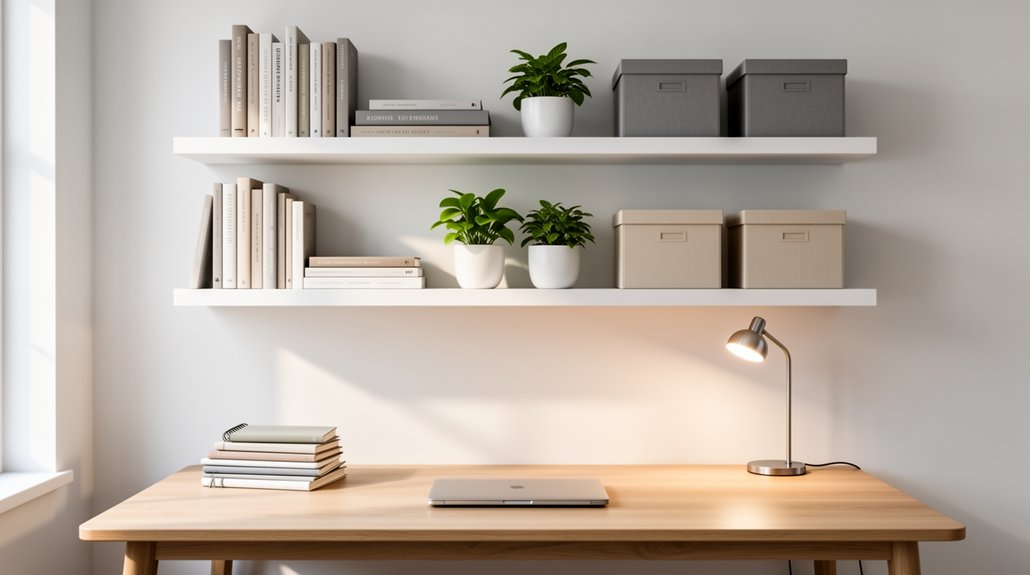
Put your most‑used items on a lower floating shelf 22–24 inches above the desk, then add a second shelf 12–14 inches higher for less‑frequent tools, keeping everything within easy reach. Use labeled baskets and dividers on each shelf to separate books, supplies, and gadgets, and install LED strip lighting underneath for clear visibility. This vertical zoning maximizes workspace, reduces clutter, and boosts ergonomics—continue and and you’ll discover even more ways to optimize your desk setup.
Place Your Daily‑Use Essentials on Floating Shelves Above the Desk

Ever wonder how a few floating shelves can transform your desk into a clutter‑free zone? You can boost desk organization by placing daily‑use essentials within easy reach on those shelves. Start with a lower shelf 22–24 inches above the surface; its 10–12‑inch depth lets you store a small notebook, pen cup, and a couple of reference books without stretching. Designate a micro‑zone on each shelf—one corner for pens, another for notebooks, and a third for gadgets—to keep items aligned and visible.
Then add a second shelf 12–14 inches higher for less‑frequent tools, maintaining accessibility while freeing the top of the desk. This simple layout reduces clutter, speeds up workflow, and keeps everything you need right where you can grab it.
Create Vertical Zones on Floating Shelves Above the Desk for Easy Access
How can you make every item on your floating shelves instantly reachable? Start by carving out vertical zones that match how often you need each object. Place pens, notebooks, and small gadgets in the lower zone, keeping them within arm’s length for quick reachability. Leave a 12‑14‑inch gap before the middle zone, where you store reference books or frequently consulted manuals, ensuring the top zone stays in your line of sight while seated. Reserve the upper zone for decorative or seasonal pieces that don’t clutter your desk.
Align the lowest shelf 22‑24 inches above the desk to maintain monitor clearance, and keep the top display zone just above eye level for comfortable viewing. This structure boosts desk organization and streamlines your workflow.
Add Baskets, Dividers, and Lighting to Keep the Shelves Organized and Stylish

After carving out vertical zones, you can tighten the look and boost functionality by adding baskets, dividers, and lighting. On your floating shelves, place storage baskets to create defined zones for books, supplies, and décor. Label each basket so you spot contents instantly, cutting search time and keeping desk organization sleek.
Insert dividers between baskets or along the shelf edge to hold notebooks, chargers, and small electronics without crowding the surface. Add under‑shelf lighting—LED strips or a tiny battery lamp—to highlight curated items and improve task illumination.
The combined effect of baskets, dividers, and lighting not only organizes your workspace but also elevates the aesthetic, making the area above your desk both practical and stylish.
Frequently Asked Questions
How to Arrange Three Floating Shelves?
Place two shelves on one side and one on the opposite, keep the bottom shelf 22‑24 inches high, space the next 12‑14 inches above, match shelf width to the desk, and use sturdy mounts.
What Are the Common Mistakes With Floating Shelves?
You often mount shelves too low, overload them, use wrong hardware, skip studs, ignore cable routing, and pick depths that don’t fit your items, leading to sagging, clutter, and instability.
What Is the Rule of Three for Shelves?
You follow the rule of three by arranging items in groups of three on each shelf—three objects, three clusters, or three zones—to create visual balance, avoid clutter, and maintain harmonious spacing.
How High Should Floating Shelves Be Above a Desk?
You should place the first floating shelf about 22‑24 inches above the desk surface, keeping a 22‑24‑inch clearance for monitors, and add roughly 2 inches if you use a monitor arm.
In Summary
By placing your daily‑use essentials on floating shelves above the desk, you turn wasted space into a functional work zone. Creating vertical zones lets you grab what you need quickly, while baskets, dividers, and lighting keep everything tidy and stylish. With these simple tricks, your desk stays clear, your workflow stays smooth, and your workspace looks polished—all without sacrificing valuable surface area.
Leave a Reply