You should place the lumbar pad 3‑5 inches above the seat, right where your natural lower‑back curve sits, to keep the spine’s inward curve and avoid flattening. Adjust the height in small steps so the pad presses gently against your lumbar region without hitting the mid‑back or tailbone. Match seat depth to your leg length, keeping feet flat and knees at 90°, and fine‑tune the pressure knob for comfort. Keep checking alignment during tasks, and you’ll discover more tips on maintaining ergonomic support.
Why Proper Lumbar Support Matters

When you sit with proper lumbar support, you keep the natural inward curve of your lower spine, preventing the flattening that strains muscles.
The lumbar support should cradle your lower back about three to four inches above the seat, preserving spinal alignment and natural curvature. An adjustable lumbar lets you fine‑tune pressure, so the seat height and seat depth match your body without forcing the mid‑back or tailbone into odd angles.
Good chair ergonomics keep your seated posture upright, reducing the risk of back pain the.
What Is Lumbar Support?
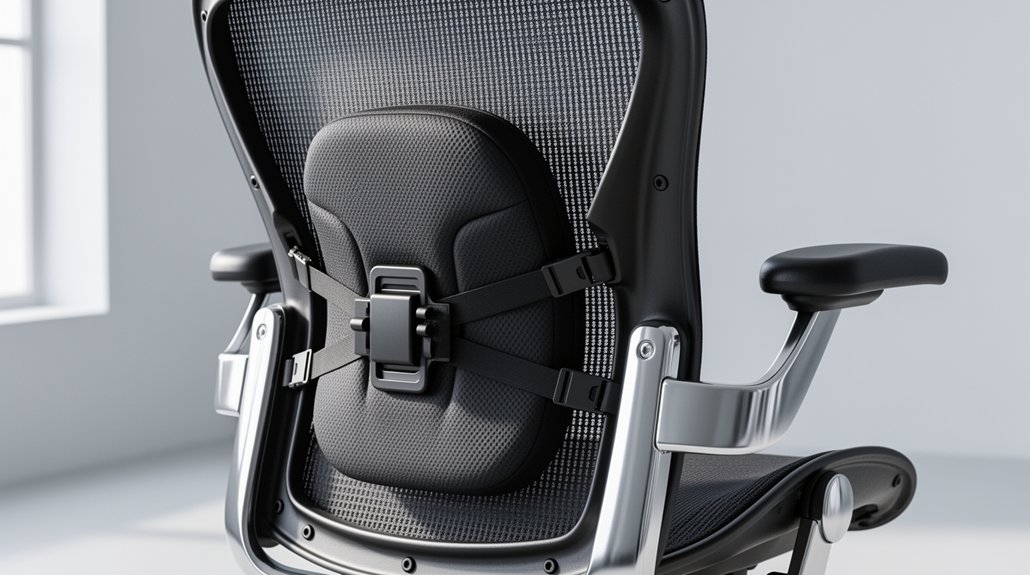
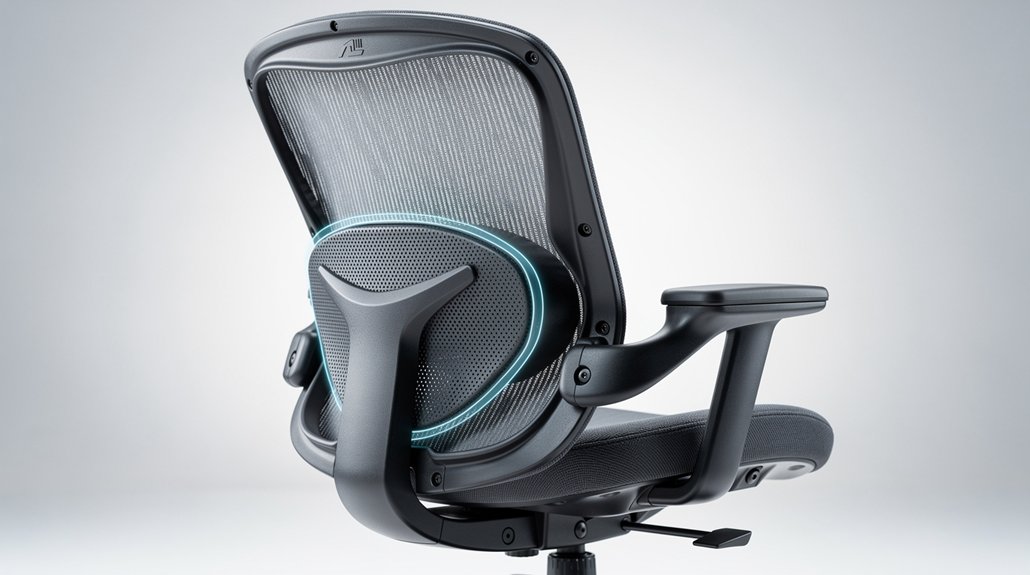
Proper lumbar support is a specially shaped pad or mechanism that fills the gap between your lower back and the chair, preserving the spine’s natural inward curve. It reinforces the lumbar region’s curvature, keeping the lower back in neutral alignment and preventing flattening that leads to muscle strain. When you adjust chair height, seat depth, or backrest positioning, the support stays in the right spot—typically 3–4 inches above the seat—so your spine stays comfortable.
Proper lumbar support fills the gap, preserving natural curve and keeping spine neutral during adjustments.
- 1. Adjustable lumbar lets you match your torso’s shape.
- 2. Ergonomic seating with proper support reduces back pain.
- 3. Correct positioning maintains natural spine curvature.
Locate Your Natural Lumbar Support Curve

Sit back, place your hands on your hips with thumbs at the back, and slide them upward until you feel the inward curve of your lower spine. That spot, usually 3–4 inches above the seat, is where your natural lumbar support lies. Adjust the seat depth so the curve aligns with the chair’s backrest without forcing your spine forward.
Identify Spine’s Natural Curve
Ever wondered how to pinpoint the exact spot where your lower back naturally curves inward? Sit upright, place your hands on your hips, thumbs pointing toward your spine, and slide them upward until you feel the lumbar curve’s natural inward dip. That spot—about 3–4 inches above the seat—marks the lumbar lordosis, the key to spine alignment and spinal health.
- Adjust seat height so your feet rest flat, keeping hips level with the seat.
- Set seat depth so your backrest supports the lower spine without pressing on the thighs.
- Align the lumbar support height with the identified dip, ensuring proper posture and optimal backrest positioning.
Adjust Seat Depth Accordingly
Where does your natural lumbar curve sit when you’re seated? Sit at the chair edge, feet flat, and rock your pelvis until you feel the inward bend of your lower back. That spot is your lumbar sweet spot.
Now perform a seat depth adjustment: slide the seat forward or back until a fist‑width gap appears between the back of your knees and the seat edge, preserving thigh clearance. Ensure the lumbar support depth keeps the backrest contact firm without pushing you away or over‑arching the lower back.
Check backrest alignment and monitor back pressure while you work for 30 minutes to two hours. Proper chair ergonomics and ergonomics seating will keep your natural lumbar curve supported, reducing fatigue and improving lower back support.
Set the Ideal Vertical Height (3‑5 Inches Above Seat)
The ideal vertical height positions the lumbar support at the natural curve of your lower back, typically 3–4 inches above the seat when you sit upright. Start by aligning the lumbar support height with your torso proportion: shorter users aim for 2–3 inches, average heights for 3–4 inches, and taller users for 4–5 inches. Use your thumbs on your hips, lift them until you feel the inward curve, then fine‑tune with height adjustment for lower back comfort and lower spine alignment.
- Check chair back curvature for ergonomic seating.
- Verify seat depth remains consistent with lumbar position testing.
- Adjust in small increments, sitting for several hours each time.
How Much Lumbar Depth Is Right for You?

You’ll start by setting the lumbar support to a middle depth and then fine‑tune it in small increments until you feel a gentle, even pressure along the natural curve of your lower back.
Notice whether the support fills the gap without pushing your spine forward; that’s your personal comfort threshold.
If the feeling stays off after a few days, adjust the depth slightly and re‑check your alignment with the seat height and backrest.
Depth Adjustment Basics
Ever wonder how far your lumbar support should reach? Start with a middle adjustment, then fine‑tune. The key is a gentle, even support pressure that keeps your spinal alignment while hugging the inward curve of the lower back. You’ll know you’ve hit the right lumbar depth when the contact point rests at that curve, not the mid‑back or tailbone, and the backrest feels like a natural extension of your spine.
- Set chair height so feet are flat and knees are 90°.
- Move the lumbar knob forward until you feel a firm yet comfortable pressure at the inward curve.
- Sit for a few hours, then adjust in small increments, noting any arching or pressure points.
This adaptive seating approach ensures consistent back support without over‑compressing the lumbar region.
Personal Comfort Thresholds
Wondering how much lumbar depth feels just right? You’ll start from a neutral position, set the height adjustment so the support meets the curve of your lower back, then fine‑tune the lumbar depth in small increments. While you sit, notice pressure distribution across the backrest: a gentle, even pressure signals you’re hitting your comfort threshold and maintaining proper spinal alignment. If a gap appears, increase depth; if you feel a hard push or an exaggerated curve, dial it back. Taller users usually need a higher lumbar depth, but torso proportion matters more than overall height. Test the adjustable lumbar support during prolonged sitting; any new lower‑back ache or mid‑back pressure means the depth is off. Adjust until the chair cradles you without forcing a curve.
Height Guides for Short, Average & Tall Users
Where do you fall on the height spectrum? Your lumbar support height must match torso proportions for proper spine alignment. Use these quick height guides:
Adjust lumbar support to match your height for optimal spine alignment and comfort.
- Short users (under 54 in): set adjustable lumbar 2–3 inches above the seat surface.
- Average users (54–60 in): aim for 3–4 inches.
- Tall users (over 60 in): raise it 4–5 inches.
When you sit upright, the target lumbar center sits roughly 3–4 inches above the seat. Feel the inward curve with your thumbs on the chair back; the support should hug the natural lumbar curve without pushing your mid‑back forward. Adjust the lumbar mechanism until the contact point aligns with your spine, ensuring ergonomic seating for any height. This simple calibration keeps your posture balanced and comfortable throughout the day.
Fine‑Tune Lumbar Support: Real‑Time Step‑by‑Step Guide

How can you fine‑tune your lumbar support in real time? Begin with the middle adjustment position, then use your thumbs to locate the inward lower‑back curve and find the lumbar center. Adjust the seat height so the chair backrest aligns with that curve, keeping backrest pressure gentle and even. Set the seat depth so the support makes consistent lower back contact without pushing the lumbar region away from the backrest. Sit upright and check that the lumbar support sits about 3–4 inches above the seat surface, preserving curvature alignment. Over several hours, test and refine height and depth, making small incremental ergonomic adjustments as needed. Maintain consistent back posture by tweaking the lumbar support whenever comfort shifts during the day.
Detect Misalignment and Quick Fixes
After you’ve set the lumbar support to the middle position and fine‑tuned its height and depth, start watching for signs that the alignment is off. Notice persistent slouch, shoulders drifting away from hips, or numbness in the thighs—these are readjustment symptoms indicating misalignment. If the mid‑back or tailbone pushes away from the backrest, the backrest interaction is wrong, so you’ll need to adjust height or adjust depth. Keep an eye on the natural lumbar curve across tasks; an inconsistent curve means the seat-to-back distance isn’t supporting proper posture alignment.
Watch for slouch, drifting shoulders, or thigh numbness; adjust lumbar height or depth for proper alignment.
- Lower the support a few millimeters to bring the spine closer to the backrest.
- Raise it slightly if you feel a gap between the lumbar pad and the lower back.
- Shift the depth forward or backward until the curve feels natural and the shoulders align with the hips.
Common Lumbar Support Mistakes & Pro Tips for Longevity
Ever notice your back pain returning after a day at the desk, even though you’ve set the lumbar support? You’re probably over‑ or under‑activating it, flattening your natural lumbar curve or forcing excessive curvature.
First, sync chair height with seat depth: a too‑deep seat pushes you forward, reducing back contact; too shallow leaves a gap and strains lower back pain.
Keep shoulders aligned over hips, and adjust the lumbar pad so it fills the curve without creating pressure points.
Remember, ergonomic seating isn’t a one‑time fix—use adjustable lumbar and micro‑adjustments throughout prolonged sitting.
Test each change for several days, switch positions regularly, and you’ll preserve posture alignment and extend the lifespan of your comfort.
Frequently Asked Questions
Can I Use a Lumbar Cushion With My Existing Chair?
Yes, you can add a lumbar cushion to your existing chair; just make sure it fits your seat, aligns with your lower back, and doesn’t push you forward, maintaining proper posture.
Will a Standing Desk Affect My Lumbar Support Settings?
Yes, a standing desk changes your lumbar needs, so you’ll need to readjust the cushion height and angle. Keep the support snug, maintain a neutral spine, and re‑evaluate each time you switch positions.
How Often Should I Read‑Adjust Lumbar Support Throughout the Day?
You should readjust your lumbar support every 60–90 minutes, especially after long sitting periods or posture changes. Frequent tweaks keep spinal alignment ideal and prevent stiffness or fatigue throughout the day.
Do Different Fabrics (Mesh vs. Leather) Impact Lumbar Comfort?
Yes, mesh lets air circulate, keeping you cooler, but leather often feels firmer, which can boost lumbar support. Choose the fabric that matches your temperature preference and how much stiffness you need for comfort.
Can Lumbar Support Be Effective for Users With Chronic Back Injuries?
Yes, lumbar support can help you despite chronic back injuries if you choose adjustable, firm cushioning that maintains your natural curve, reduces strain, and complements targeted therapy, but always consult your healthcare provider first.
In Summary
By mastering lumbar support, you’ll sit smarter, stay healthier, and boost productivity. Keep the curve aligned with your spine, adjust height and depth to fit your body, and fine‑tune as needed. Avoid common pitfalls—don’t let sagging or over‑tightening ruin comfort. Consistently applying these steps ensures lasting support, reduced back strain, and a more ergonomic workspace every day.


Leave a Reply